But if at a younger age it is not difficult to lose a couple of kilograms, then follow diet after 60 years much more difficult:
- metabolism slows down
- health complaints appear,
- body tone is reduced.
Nutritionists are of the opinion that the norm is the weight at which a woman gets sick less and lives longer. Therefore, dear women, if you are plagued by various diseases caused by those unfortunate extra pounds, start fighting for your health and beauty immediately!
This call probably sounds most appropriate today! Many of us dream of starting a new life on Monday... Let's start it with the New Year!
Of course, someone will say that they didn’t find anything new in this article, but for some, I’m sure it will become a new page in rethinking the nutrition system, physical activity, and generally life after 60 years!
Very often, when talking about a weight loss system at any age, we need to start weight loss diary, in which you scrupulously write down everything you eat during the day, counting the number of calories, and not forgetting to write down what kind of physical activity you did during the day. You, of course, can do all this if you already have at least a little experience losing weight. But, in my opinion, these are still the main rules.
How to lose weight after 60 years:

First of all, we identify the causes of excess weight.
And also, dear ladies, your mood is an important cog in the mechanism of your mood and well-being! Find something you like, get a favorite pet, read poetry, learn languages, master a computer, so that apathy and laziness do not take over your beauty and youth!
If you follow these simple tips diets after 60 years, you will not only get rid of excess weight, but also significantly improve your well-being. And remember: the main thing is to really want it, and then even the most impossible task will turn out to be easily solvable!
Many residents of the country have known about the benefits of physical exercise since childhood, because I instilled this idea in my mother-in-law in kindergarten. To begin with, from an early age, addiction to physical activity begins to develop with the help of morning exercises. Later, you can add full-fledged daytime workouts. But you shouldn’t forget about morning exercises. On the contrary, many doctors emphasize that a person whose morning begins with a light workout is healthier and more resistant to various diseases. And the performance of an organism warmed up in the morning increases significantly.
For women over 60, the need to charge increases several times. Performing certain exercises at home regularly, day after day, will allow you to stay young and full of energy longer. However, in our country, gymnastics for the elderly is practiced very little. This is due to the fact that people over 60 consider themselves already deserved pensioners, for whom sport is something supernatural and unbearable. In fact, it has long been proven that morning exercises for the elderly, on the contrary, are very useful and necessary. But those who enter old age are little informed about its positive impact.
The benefits of gymnastics
Today, doctors, nutritionists, and fitness trainers are talking about the benefits for people of 60 physical activities. Even psychologists note that gymnastics for the elderly has a calming effect, making them more emotionally stable, especially in stressful situations. Not everyone knows, but facial exercises after 60 are also useful, helping to visually prolong youth.
But first, let's look at the benefits for women after 60 years of general charging.
First of all, daily morning exercises are necessary to prevent the development of:
- heart diseases,
- vessels,
- blood pressure disorders,
- sagging muscles, skin,
- disturbances in the functioning of the vestibular apparatus,
- joint diseases,
- salt deposits, etc.

Daily gymnastics for women after 50 or 60 years of age significantly increases the tone of the whole body, blood circulation improves, the cells of all tissues and especially the brain receive more oxygen. As a result, women who devote at least 15 minutes a day to such an activity feel much better and younger than their peers, are full of energy, and complain less of pain.
Selection of exercises
The complex of morning exercises should be selected carefully, taking into account the presence of chronic diseases and their characteristics. Because the main goal of exercise at sixty is to improve health, and not harm it. In addition, for women over 60, the load should be gentle. At home you can start with:
- Breathing,
- warming up the hands, knee joints,
- vestibular exercises,
- walking in place
Exercises with dumbbells for mature women or daily running at the stadium are possible and optional. Even the above simple exercises will be enough to feel an improvement in your well-being.
Although, if a woman has been involved in sports all her life, at retirement age you can add dumbbells to your daily routine. Exercises with dumbbells for women allow you to train your muscles more strongly, which will subsequently affect excellent posture, a toned figure, and the general tone of the muscles of the arms, chest, and back.
The essence of facial exercises
A person over 60 needs active care. It is generally accepted that it is enough to use creams, masks, scrubs to look good. Those with higher incomes can afford a facial after 60 different lifts, injections, laser corrections, etc.
In fact, no matter what anti-aging cosmetics are, they themselves will not give the effect that can be achieved together with special exercises for the face after 60.
These exercises are aimed at training the facial muscles, increasing their tone and improving blood circulation. If you do facial exercises every day after 60, you can reduce the rate of wrinkle development and prevent:
- drooping of the eyelid
- depression of the cheeks
- appearance of a double chin, etc.
Facial training after 60 should preferably be carried out after morning or evening washing. All you need to implement it is your own hands and the desire to look great.
The simplest exercises will be the following:
- with the middle and index fingers, from the middle of the forehead to the temples, you should make smoothing movements for several minutes,
- with your index finger you need to lift the tip of your nose up, while pulling your upper lip down (15 times),
- You need to place your fingers in the corners of your lips and use them to stretch and compress your lips for several minutes,
- pulling the cheeks between the teeth, or one and a half minutes, or 20-30 times,
- when closing the eyelid, use your index fingers to press on their corners, preventing them from lowering calmly (provide resistance 15 times),
- stretching your lips you need to pronounce letters such as a, i, o, u, s, e,
- You should draw circles with your chin and “write” letters or numbers.

These exercises are very simple and quick to perform. But for a person over 60, they play a very important role, as they significantly eliminate age-related imperfections. Regular facial gymnastics after retirement age often gives an effect that is several times greater than the results from expensive creams and even injections. And most importantly, this form of anti-aging treatment is absolutely safe and free.
And considering that facial skin after 60 is more susceptible to the negative effects of external factors, this method can be a salvation for many.
You can see such classes in more detail in practice using videos useful for women on the Internet, which contain step-by-step instructions and a visual demonstration of the entire complex.
To summarize, we can conclude that for a 60-year-old lady it is possible to stay young and healthy without leaving huge amounts of money at the pharmacy. Sometimes it’s enough just to forget about your laziness and give your body a few minutes to develop immunity from aging.
After 60 years, everyone gets the opportunity to appreciate all the “delights” of approaching old age: when muscles, bones, cardiovascular, endocrine and other systems are no longer the same. This is why strength training after 60 is no less important for health and longevity than training at 20 years old.
Consequences of not training with weights
1. Loss of muscle mass
Once you reach 40 or 50 years of age, your body begins to steadily lose muscle tissue. This process may be partly due to a decrease in the level of physical activity and the production of anabolic hormones.
As you know, there are 2 types of muscle fibers: type I (“slow” muscle fibers) and type II (“fast” muscle fibers). It is the second type of fibers that is capable of producing a force 2-4 times stronger than fibers of the first type. Unfortunately, as we age, we lose predominantly fast-twitch fibers. What do you think happens when we lose muscle fibers that are responsible for strength and power?
2. Loss of functionality
Functionality is one of the most important abilities that makes life easier after 60 and can significantly improve its quality in old age.
Below we will look step-by-step at how, over time, loss of strength and power leads to limited functionality and eventually disability.
Stage 1 – muscle pathology
Muscle pathology is characterized by the following manifestations:
- Loss of motor units.
- Changes in muscle fibers.
- Amyotrophy.
- Decreased neuromuscular communication.
- Slowing down the rate of muscle activation.
Stage 2 – loss of functionality
This stage is characterized by a decrease in the speed of movement and force production.
Stage 3 - Functional Limitations
At this stage, people take longer to climb stairs and get out of chairs.

Stage 4 – onset of disability
This is the saddest stage, because without the help of a cane it is difficult for a person to leave the house.
The 4 stages above show how giving up exercise slowly but surely leads to a decrease in quality of life.
Training after 60 years: strength or power?
If you are 60 years or older, strength training in its classical sense is not the best option for you. The optimal type of training for older people is speed-strength training (power training).
If classic strength training involves performing movements at a slow pace (for example, 3-4 seconds per repetition on the bench press), then speed-strength training means performing exercises at maximum speed.
A number of studies have shown that power is responsible for the ability of older people to cope with such types of daily activities as walking in the park, walking up the stairs, getting up from a chair. Scientists also consider power to be the main ally of functionality.
In 2011, Swiss researchers analyzed several studies and concluded that speed training provides greater functional benefits for older adults than classical strength training.

Training after 60 years: tohow to train power?
Power training involves performing movements at as fast a pace as possible. However, this type of training should not be confused with training for weightlifters. Power training is a common gym workout that involves lifting weights as fast as you can (with perfect form, of course).
Most studies used machines rather than free weights. The exercises were performed in 2-3 sets for large muscle groups, which were trained 2-3 days a week. The intensity of the training was 70% of the maximum weight that the subjects could lift, which was 8-10 repetitions per set.
Workouts after 60 years:safety
Most studies involved elderly people who did not experience problems with bones, joints, or the cardiovascular system.
Unless you're an energizer nerd, choose a lower workout intensity level. Perform exercises with a range of not 8-10, but 15-20 repetitions. This way you will be safe from possible negative consequences of training.

CONCLUSIONS
- If your age is close to 60 years or more, do not give up weight training. By limiting your physical activity under the pretext “I’m already old, my bones and heart won’t withstand the stress,” you are doing yourself a “disservice.”
- Train at speed so you can improve your functionality and ensure a more comfortable standard of living in old age.
- Train your muscles 3 times a week in 2-3 sets of 8-10 or 15-20 repetitions.
- Don't forget that each of us is individual. Don't overdo the intensity of your workouts.
Elderly people face social problems,
health problems,
lack of attention from surrounding people.
Let's clarify the age names:
- Old age – 60 – 70 years;
- Senile age – 70 – 80 years;
- Centenarians - over 80 years old.
In old age, as a rule, there are many different chronic diseases accumulated throughout life. The aging body gradually loses the ability to produce “youth” hormones - sex hormones, as well as adrenal hormones, which reduce the likelihood of exacerbations of previously suffered diseases.
There is no doubt that any disease leaves some consequences. In youth, this is not so noticeable, but with age, due to the atrophy of organs and the extinction of their functions, the body has difficulty coping with stress, immunity decreases, a person quickly gets tired, and chronic diseases often worsen, which often have an atypical course with insufficiently expressed symptoms. Something always hurts. Some women tend to think that they have been jinxed. But there is no one to blame.
Life goes on, and you need to strive to improve and strengthen the body, maintain self-care skills, not allow yourself to relax: try to do all your homework, keep your home clean and tidy and your body hygienic, take care of your appearance, be neat and collected (thoughtful) so that rationally carry out the necessary things and save energy and time, which “flies” faster and faster with age.
Physical therapy is necessary for older people. Indeed, with the most common diseases such as osteochondrosis of the spine, osteoporosis of bones, arthrosis, vegetative - vascular dystonia, sleep disorders, hypertension, diseases of internal organs, metabolic disorders and other diseases, the body needs compensation (adaptation to internal and external conditions that matter for health and life expectancy).

Skeletal changes in bone osteoporosis.
When selecting physical activity for older people, we take into account that metabolism is reduced, the content of under-oxidized breakdown products is increased (easy fatigue, overwork should not be allowed);
there are changes in the skeleton, increased tone and decreased muscle strength, impaired posture and gait due to a shift in the center of gravity;
possible cerebrovascular accidents, encephalopathy, problems with coordination of movements and balance;
there may be prolapse of internal organs, urinary incontinence;
decreased vital capacity of the lungs, dystrophy of the heart muscle.
In older patients, there is limited movement of the eyeballs (especially upwards), you have to turn your head, and you may feel dizzy.
We must also remember about age-related changes in the psyche. With age, pre-existing character flaws worsen. Emotional lability appears (tearfulness, moodiness, grumpiness), apathy, and there is a reluctance to exercise.
Due to the constant feeling of fatigue and illness, older people may find it difficult to perform exercises. And yet you need to force yourself to overcome the malaise and, starting with the simplest exercises, gradually increase your physical activity. Physical exercise is an excellent means of preventing body disorders, and therapeutic exercises for the elderly improves quality of life in many diseases, increases self-confidence and improves mood.
Control of the cardiovascular system is very important to avoid myocardial infarction.
Need to determine heart reserve. To do this, you need to calculate the maximum permissible heart rate during physical activity and heart rate at rest in 1 minute.
HR (heart rate) maximum = 180 – age.
For example, age 62 years. Maximum heart rate = 180 – 62 = 118 (beats per minute).
Use a stopwatch to calculate your resting heart rate (after 15 minutes of rest) in one minute. Let's say 84 beats per minute.
HR (heart reserve) = maximum heart rate – resting heart rate.
RS = 118 – 84 = 34 beats per minute (100%). This means that your heart rate during physical activity should not be higher than 118 beats per minute. And you need to know the heart reserve because for people over 60 years old it is not necessary to give a 100% load.
In old age (60–70 years), we use up to 90% of the heart reserve.
In the elderly (70 – 80 years old) – up to 50%.
For centenarians – no more than 40%.
We approach this gradually, starting with the load
20% of individual heart reserve.
So, for example, at the age of 62 years, the heart reserve at a resting heart rate of 84 beats per minute is 34 beats per minute - this is 100%.
During the first sessions of therapeutic exercises, you can allow an increase in heart rate by 20% - in this example, by 7 beats per minute.
And in the future, after gradual adaptation to physical activity, you can allow an increase in heart rate to 90% of the heart reserve - in this example, by 30 beats per minute.
So, in this example, at the age of 62 years and with a heart rate at rest of 84 beats per minute in the first classes, we allow an increase in the heart rate by 7 beats per minute (= 91 beats per minute), gradually increasing the load, we allow the heart rate to reach 90% of the heart reserve (at 30 beats per minute). Heart rate will be up to 114 beats per minute.
Now take a piece of paper and a pen, a watch with a second hand, sit in a chair for 15 minutes to rest.
1). Write how old you are.
2). Now subtract this number from 180. Write: “The maximum heart rate is …”.
3). Calculate the heart rate for 1 minute using the second hand and write this figure as follows: “Pulse at rest is …”.
4). Calculate cardiac reserve using the above formula. (HR (heart reserve) = maximum heart rate - resting heart rate). Write this number.
You can adjust the load from 20% to 90% of your heart reserve by monitoring your heart rate during exercise.

Classes using the small group method in the clinic.
Small group classes are useful for older people, as this involves communication with peers, which older people really like. But you can practice on your own at home.
Exercises for all muscle groups are used.
Class density is 50 - 60%. The rest of the time is used for counting the pulse, demonstrating exercises, changing the starting position, and static breathing exercises.
The duration of the lesson is no more than 30 minutes, 2 – 3 times a week.
All initial positions are acceptable, but ref. the standing position should not prevail.
Exercises with sharp turns and bends are excluded. Dthe movements are smooth, the pace is slow.
Exercises for balance and vestibular functions are required.
It is necessary to know what factors contribute to poor balance and unexpected falls in older people.
- Tremor of the limbs.
- Increased reaction time.
- Weakness of the hip and leg extensor muscles.
- Orthostatic hypotension (a sharp drop in blood pressure with a rapid change in body position from the initial lying position to a standing position.
- Visual and hearing impairments.
- Shifting the center of gravity forward.
- The cervical-diaphyseal angle is changed (from obtuse it becomes straight), which reflexively affects cerebral circulation.
- In men, it is difficult to bring their legs together; in women, on the contrary, they spread their legs apart, which makes it difficult to maintain stability when losing balance.
Falls must be excluded, since with osteoporosis, falling from a height can result in bone fractures and other injuries.
Therapeutic gymnastics for the elderly carried out only when satisfactory condition of the patient.
Contraindications for group classes is urinary incontinence and a categorical refusal to exercise.
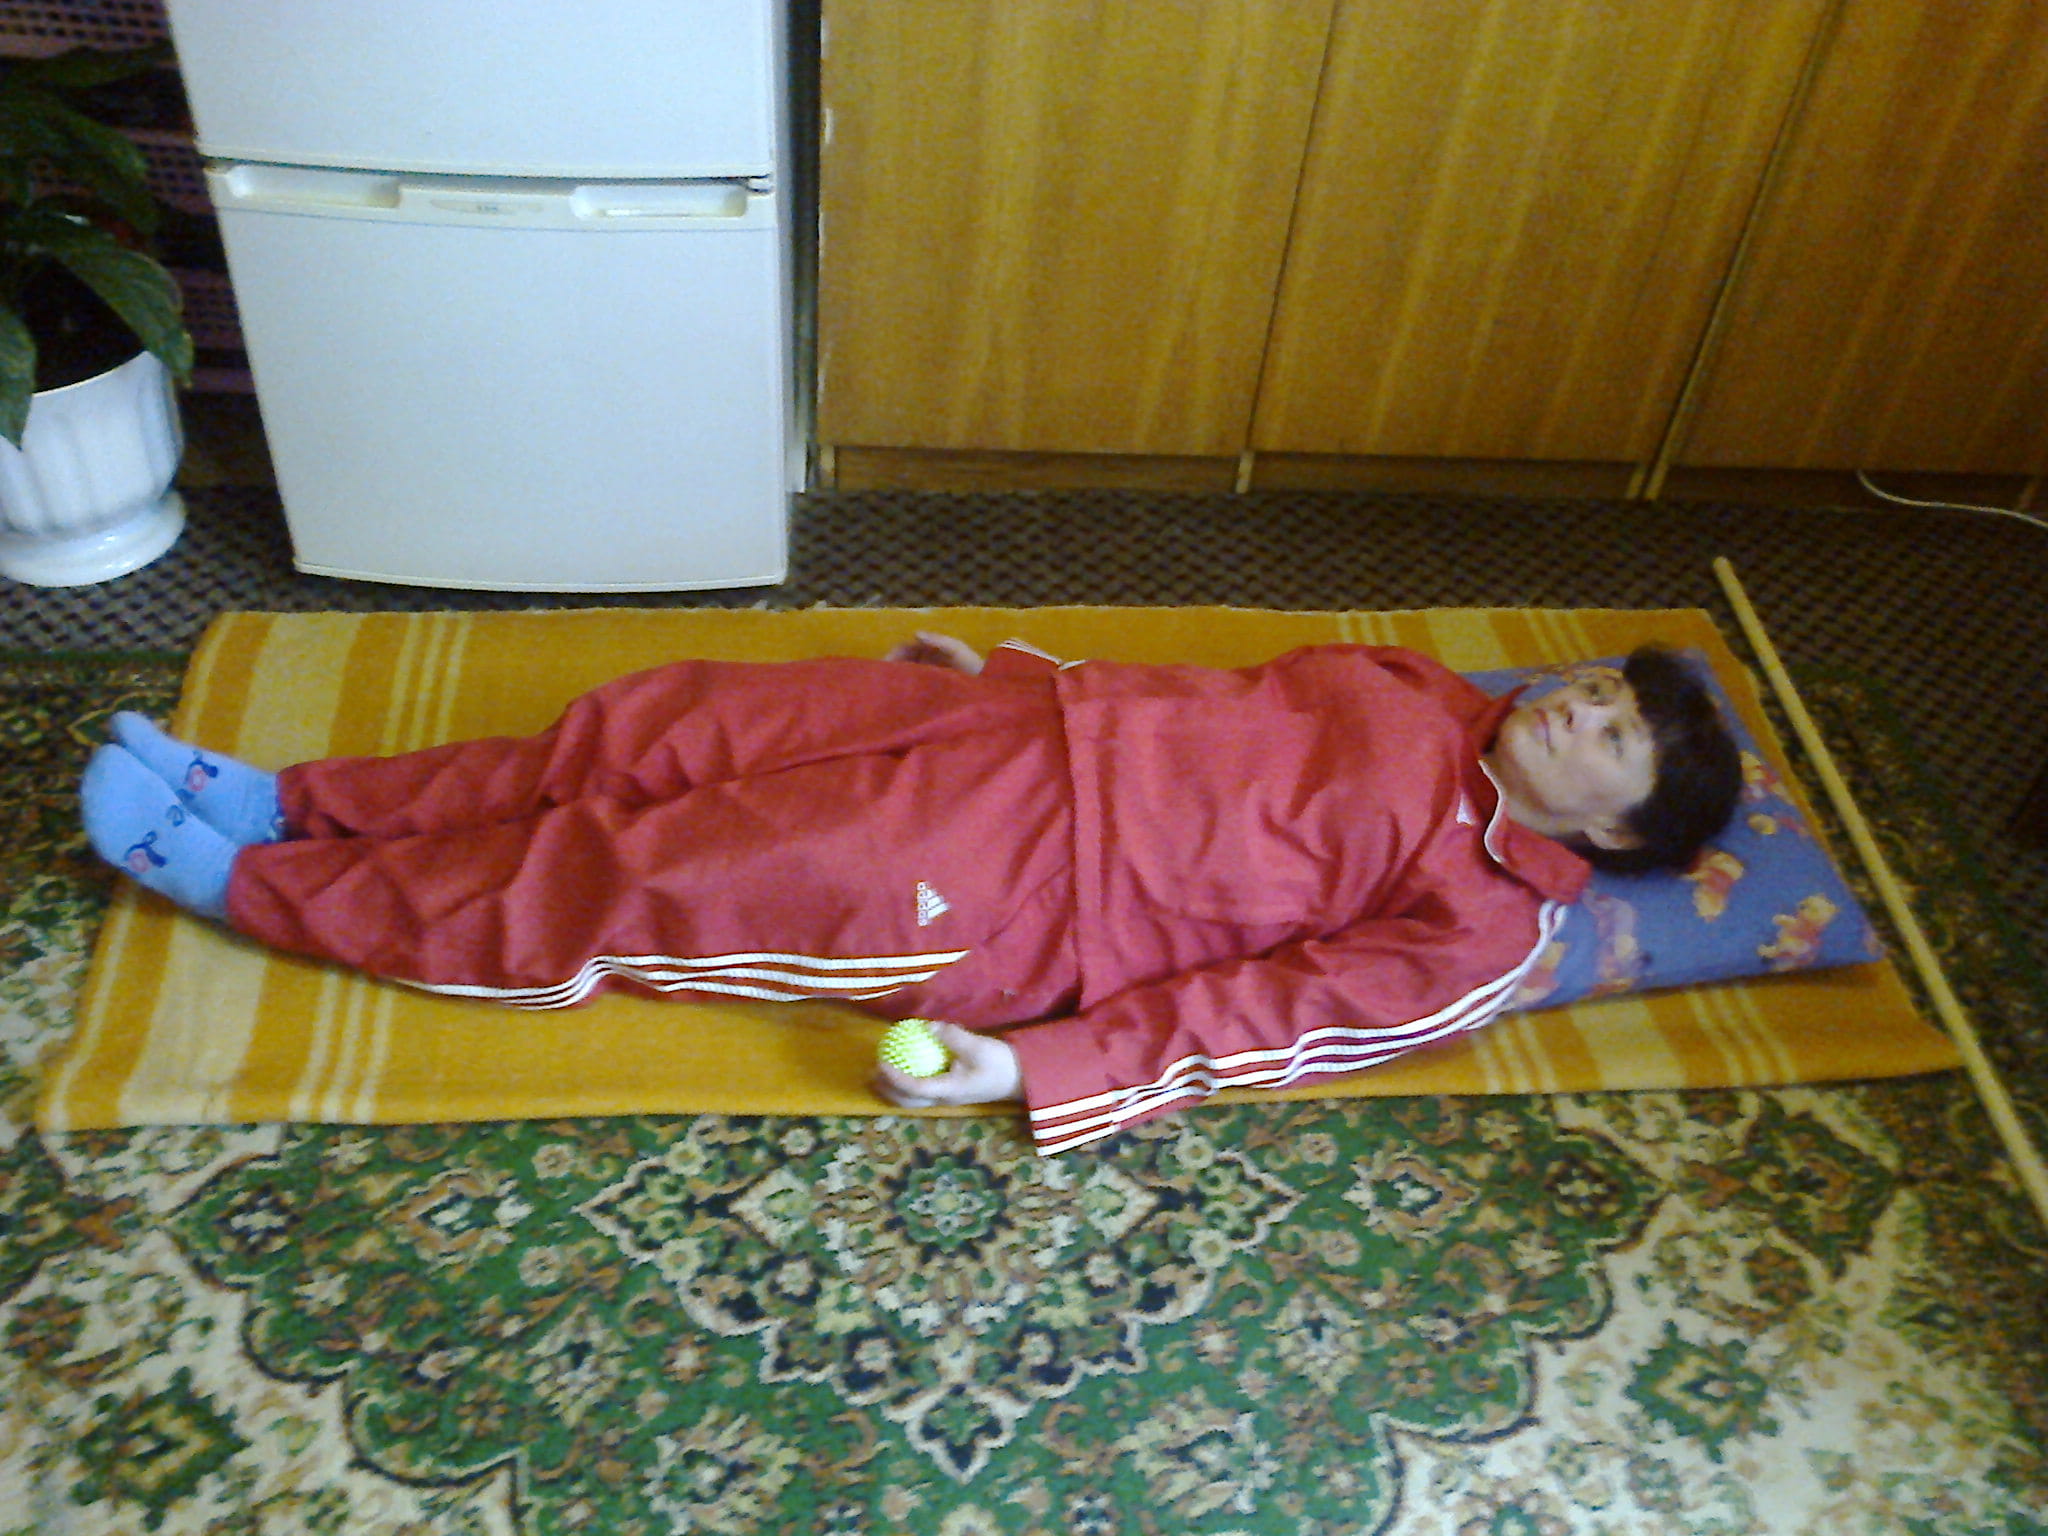
Version of a set of exercises for the elderly for copying without pictures.
Let's prepare a ball the size of an orange (or better yet, an orange), a gymnastic stick (the length of the stick is selected as follows: the distance from the left shoulder joint to the fingertips of the right hand straightened towards the side, or while standing, measure the distance from the floor to the xiphoid process of the sternum, subtract 10 from this figure).
1). "Open - close." Hands on knees, feet shoulder-width apart. 1- Hands to shoulders (start of inhalation). 2- Straighten your arms to the sides, open your palms (inhale). 3- Hands to shoulders again (beginning of exhalation). 4- Place your hands on your knees and bend forward slightly (exhale). 4 times.
2). “Raise your leg.” Hold the seat of the chair with your hands. 1- Raise your straightened right leg. 2- Lower into original. position. 3- Raise your straightened left leg. 4- Return to original. position. 4 times.
3). "Shoulder rotations." Hands to shoulders, feet shoulder-width apart. 1, 2, 3, 4 – Draw one large circle with your elbows. 4 times. Then do the same in the opposite direction 4 times.
4). "One foot at a time." Hold the seat with your hands, legs spread wide. 1 - Place your right leg on your left, tightly squeeze your pelvic floor muscles (inhale). 2 - Return to original. position (exhalation). 3 - Place your left leg on your right, squeeze your pelvic floor muscles (inhale). 4 - Return to original. position (exhalation). 4 times.
5). "We're swinging the stick." (Balance exercise). Place the gymnastic stick vertically with one end on the floor, press the lower end with your feet, spread your knees wide, place your hands on the upper end of the stick on top of each other. 1 – Leaning on the stick, straighten your arms forward, slowly leaning forward so that your head drops between your hands at ear level (exhale). 2 - Return to original. position (inhalation). 6 times slowly.
6). “Put the stick vertically.” Take the stick between your palms so that the ends of the stick rest against the middle of your palms, lower the stick down (on your hips), feet shoulder-width apart. 1 – Place the stick vertically on your right leg so that your right hand is at the top and the left is at the bottom (inhale), look at your right hand. 2 – Return to the starting position (exhale). 3 - Place the stick vertically on your left leg so that your left hand is at the top and the right hand is at the bottom (inhale), look at your left hand. 4 – Return to the starting position (exhale). 4 times.
7). “Roll a stick on your back.” Press the stick to your back with your elbows, legs apart for stability. Move the stick along your back with your elbows up (inhale) - down (exhale), do not bend over, keep your back straight.
8). Diaphragmatic breathing 6 times. Place your hands on your stomach, bend your legs at the knees. 1 – inhale through the nose, inflating the stomach. 2 – Exhale through the mouth in a thin stream slowly, pursing your lips into a tube; the stomach “deflates”, pull the abdominal wall “into itself”.
9). "Ball under the knee." Arms to the sides, ball (orange) in the right hand, straightened legs together. 1 – Bend your right leg, transfer the ball under your knee to your left hand (exhale). 2 - Return to the starting position (inhale), ball in your left hand. 3 – Bend your left leg, transfer the ball under your knee to your right hand (exhale).
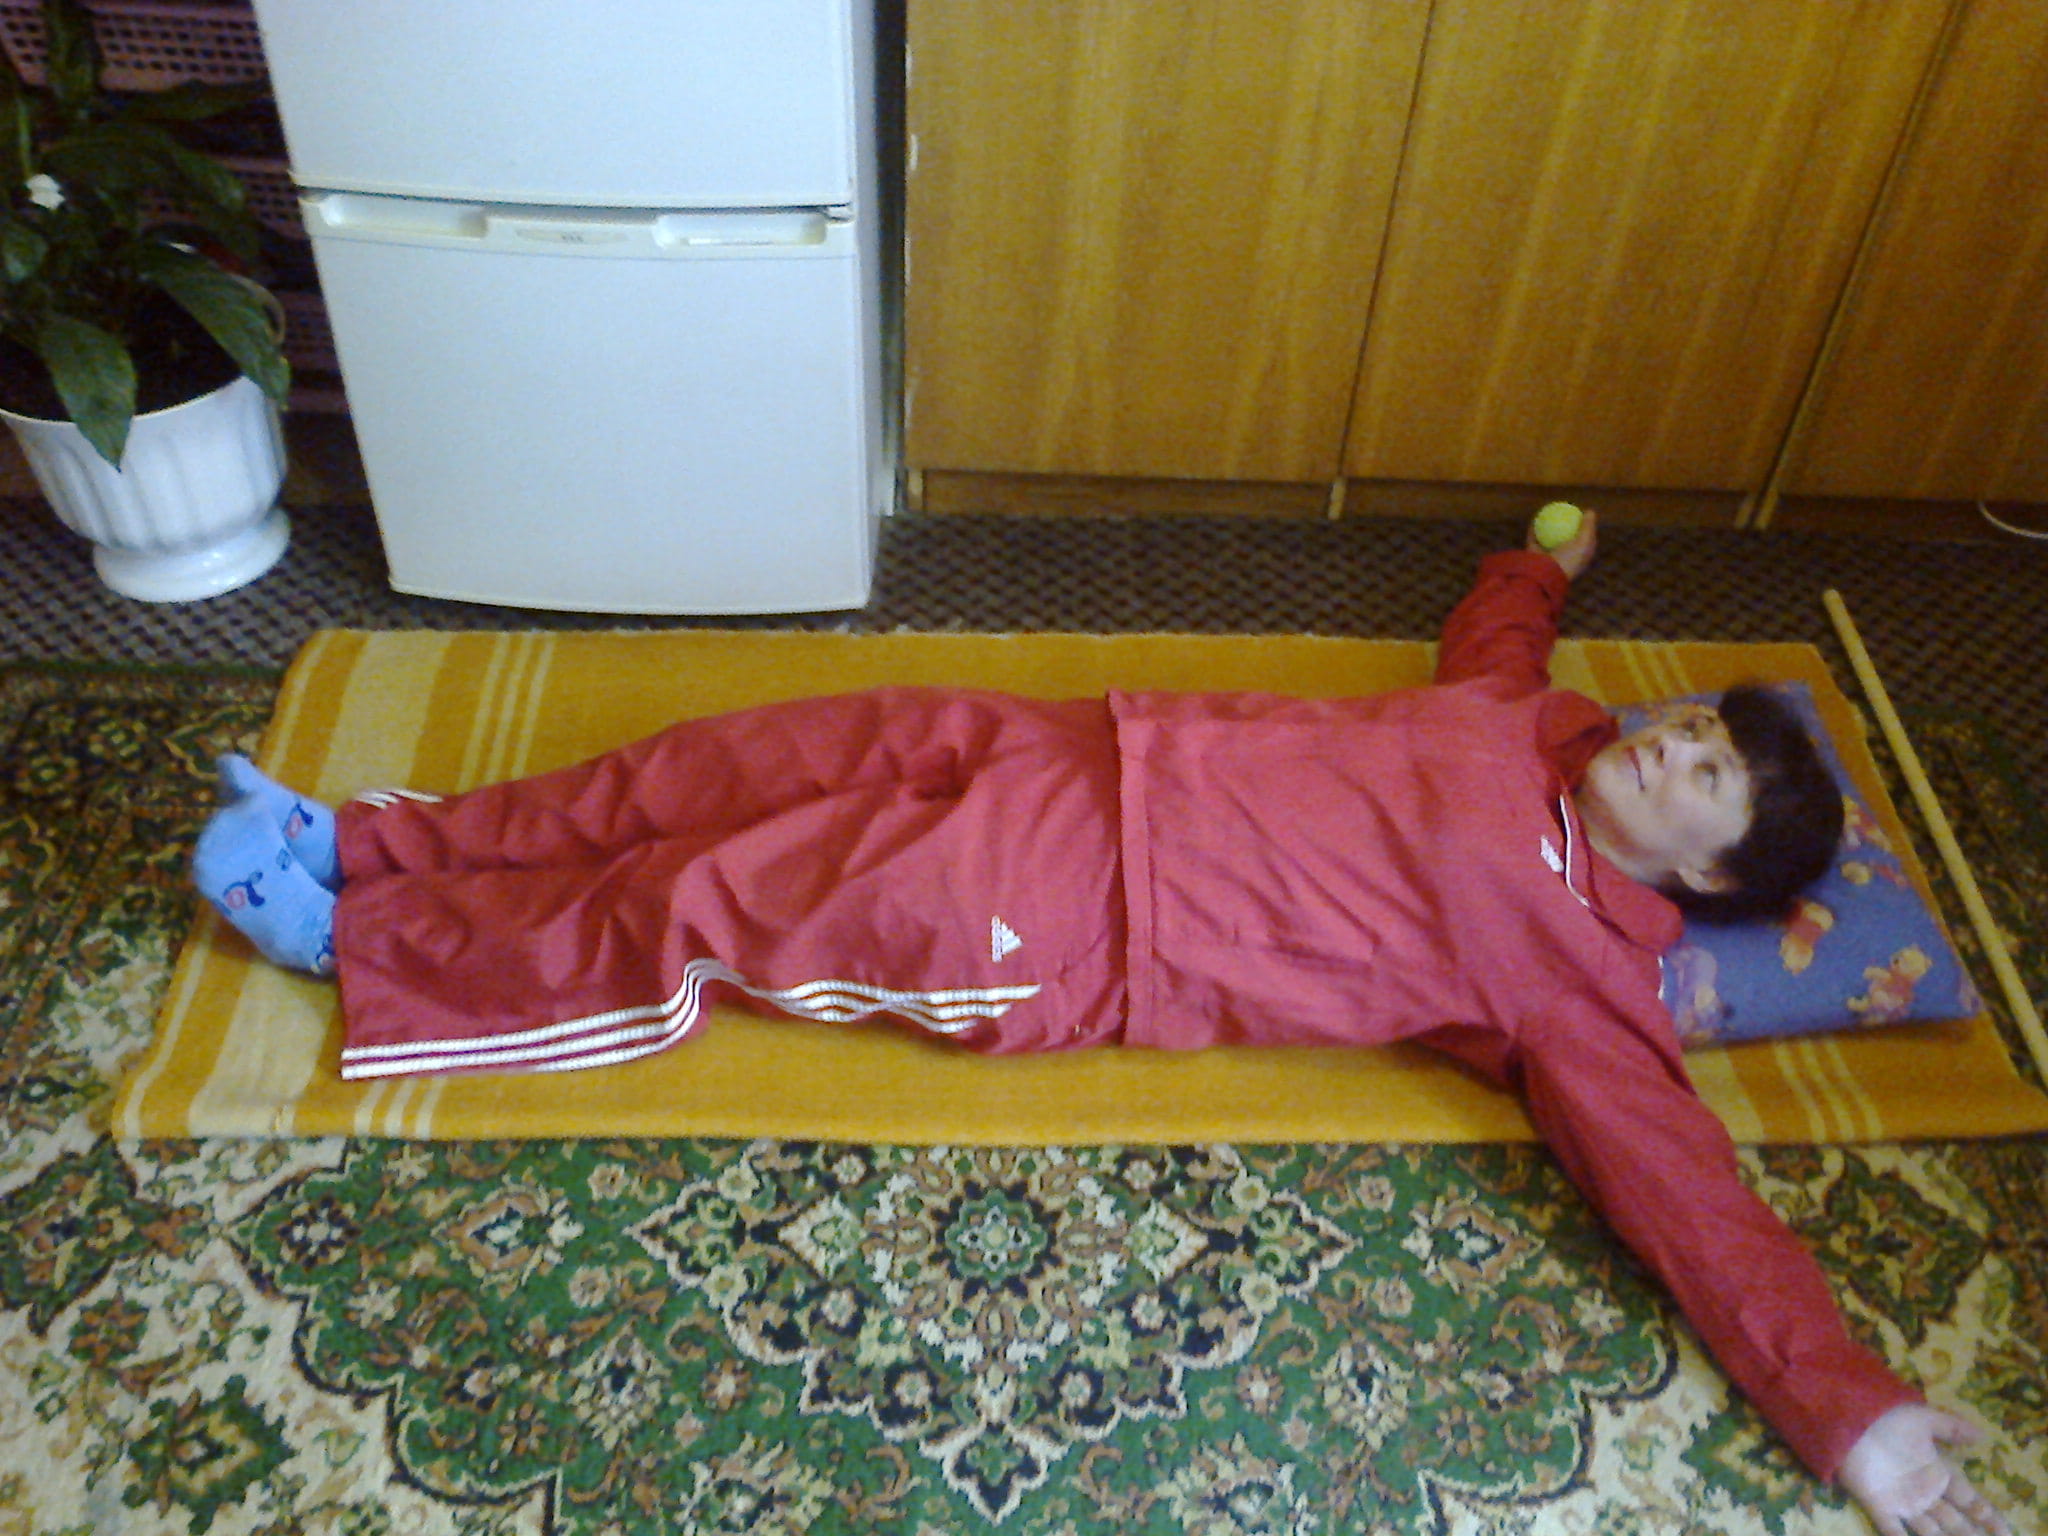
10). “The ball is in the other hand with a turn.” Arms to the sides, ball (orange) in the right hand, straightened legs together. 1 – Raise your right hand with the ball and move the ball to your left hand, turn your body to the left, take the ball in your left hand (exhale). 2 - Return to the starting position (inhale). 3 – Also transfer the ball to your right hand, turning your body to the right (exhale). 4 - Return to the starting position (inhale). 3 times.
eleven). “The ball is in the other hand behind the head.” Arms along the body, ball in the right hand, legs straightened. 1 – Hands slide across the floor behind your head, pass the ball to your left hand, without moving your head, raise your eyes towards the ball (inhale). 2 - Return to the starting position (exhale). 3 – Place the ball behind your head in your right hand, raise your eyes up (inhale). 4 - Return to the starting position (exhale). 3 times.
12). “Rotate your hands and feet.” Arms bent at the elbows, hands in fists, feet shoulder-width apart. Slowly and smoothly rotate your fists and feet inward, then in the opposite direction for 4 circles. Repeat again.
13). Arms along the body, legs straightened. 1 – Raise your right hand up and place it on the floor behind your head, while simultaneously bending your left leg at the knee, sliding your foot along the floor (inhale). 2 - Return to the starting position (exhale). 3 – Raise your left arm up, bend your right leg at the knee, sliding your foot along the floor (inhale).
14). "Tension - relaxation." Arms along the body, legs straightened. 1 – Clench your hands into fists, your feet towards you, and squeeze your buttocks tightly (inhale). 2 – Relax all muscles (exhale). 6 times.
15). "Opposite limbs to the sides." Arms along the body, legs straightened. 1 - Move your right arm and left leg to the sides (inhale). 2 - Return to the starting position (exhale). 3 – Same with left arm, right leg (inhale). 4 - Return to the starting position (exhale). 4 times.
16). Diaphragmatic breathing 6 times. (See exercise No. 8).
We count the pulse for one minute and write it down. (Pulse should not exceed maximum heart rate).
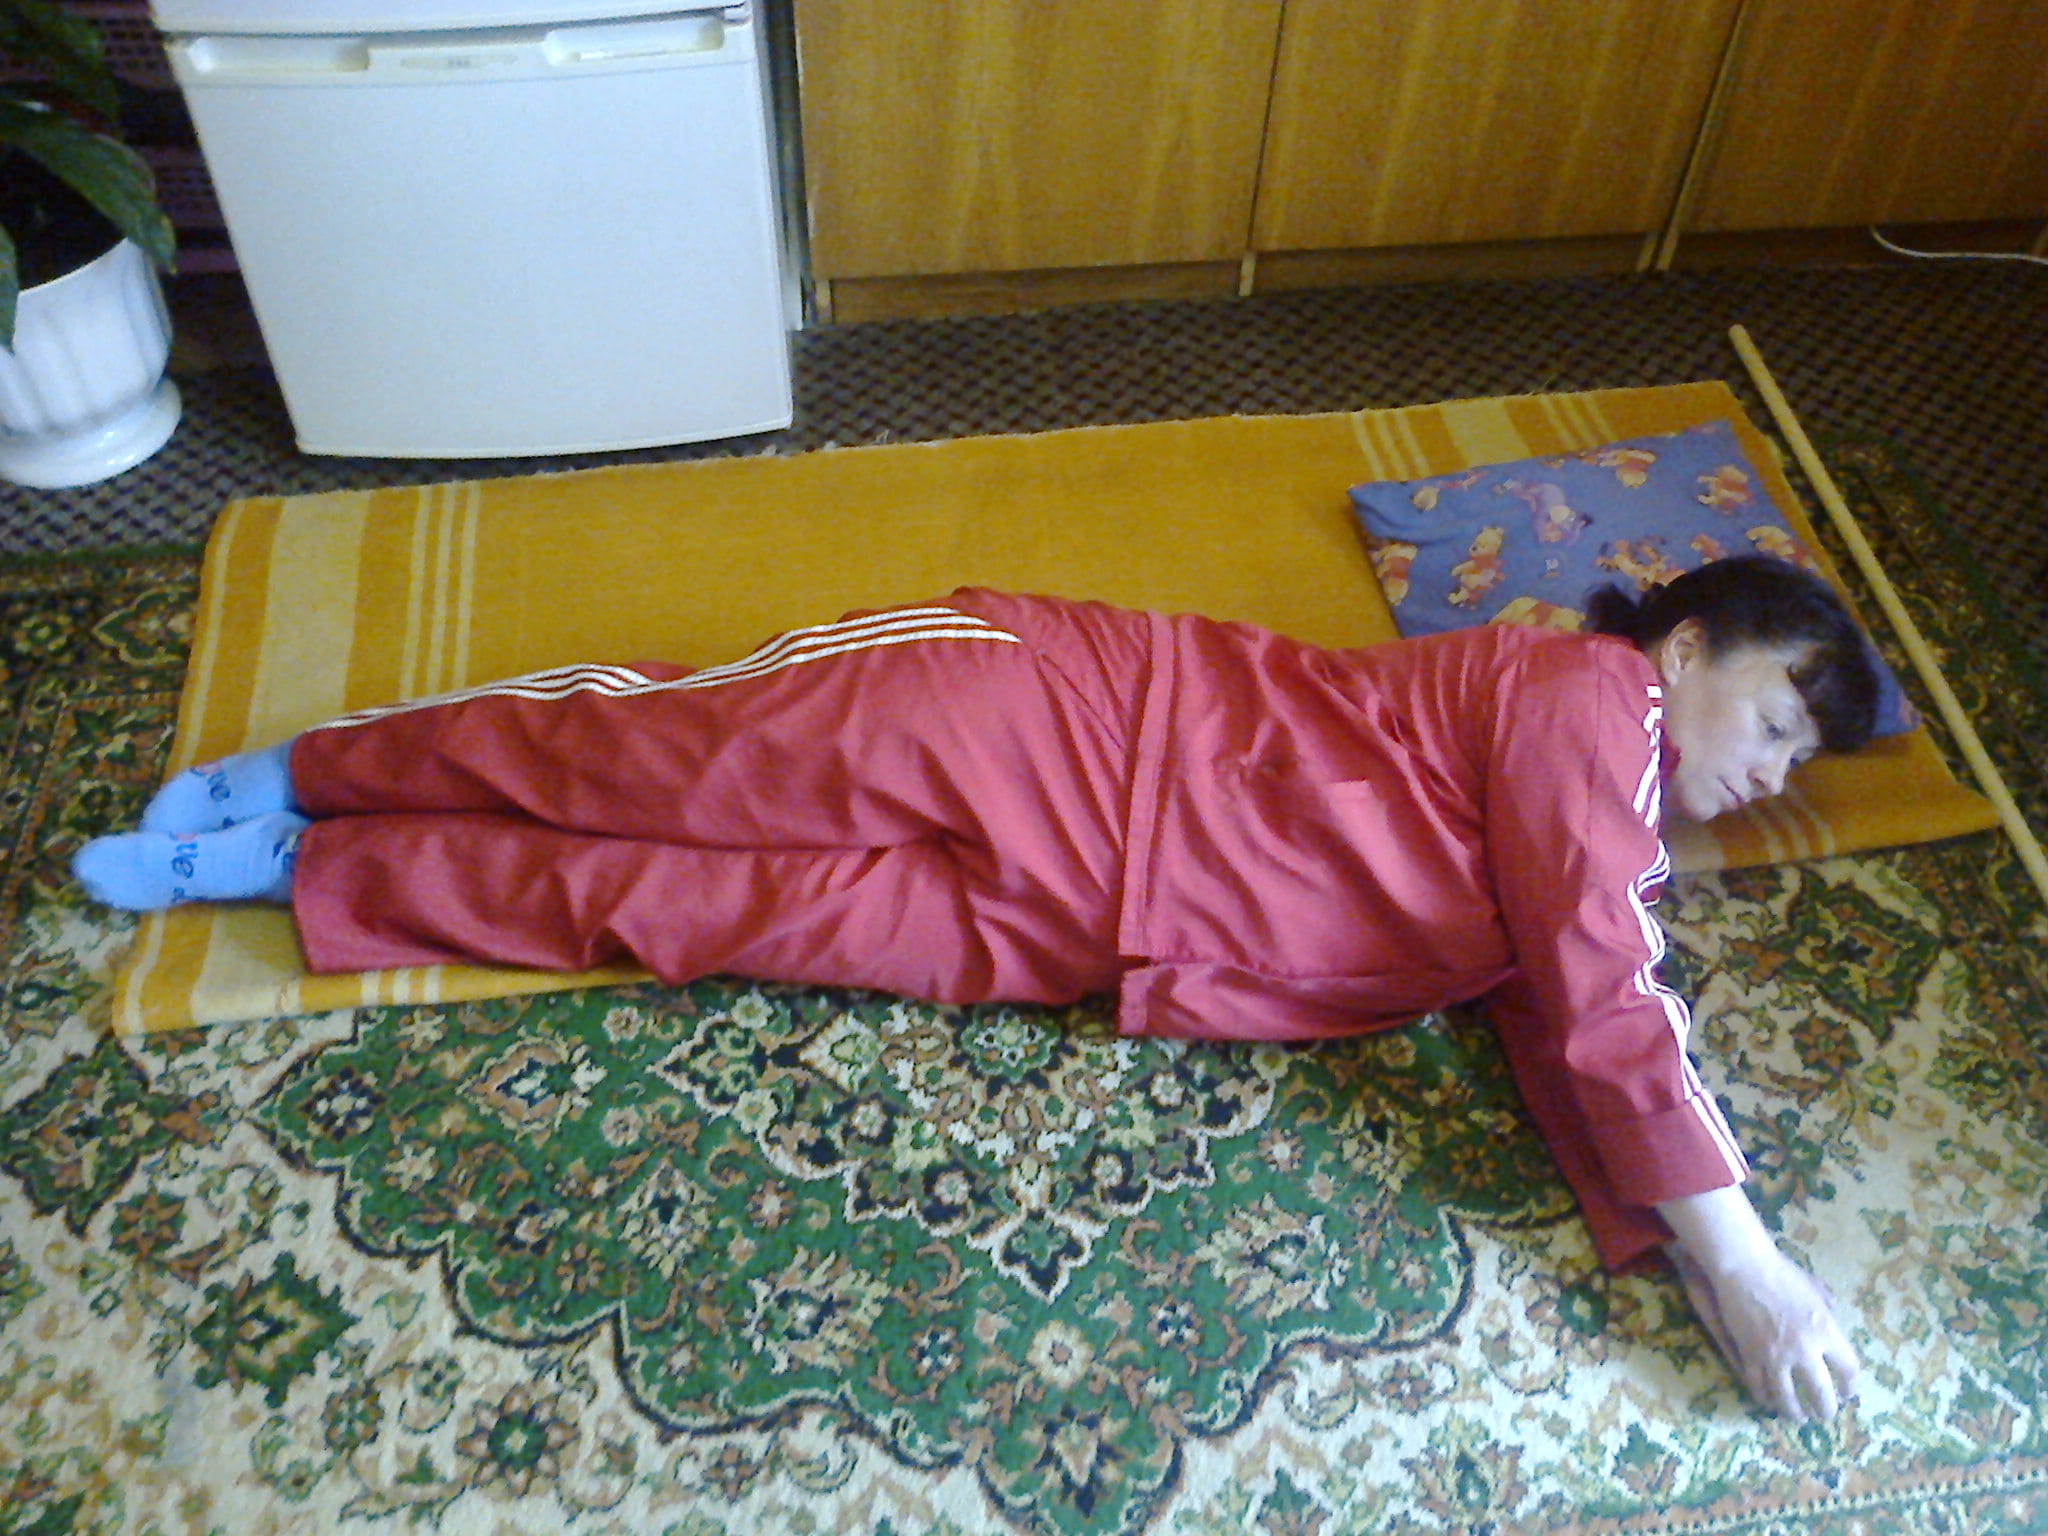
17). “Rest your head in your hands.” Arms bent at the elbows, lying in front of you, head raised, look up. 1 – Lower your head onto your hands with your right ear, turning it to the left (exhale), relaxation. 2 - Return to the starting position, raise your eyes up (inhale). 3 – Place your head on your hands on your left ear, relax (exhale). 4 - Return to the starting position, eyes looking up (inhale). 4 times.
18). "Hands on the pelvis." Arms extended forward, legs straightened. 1 – Place your right hand on your pelvis. 2 – Place your left hand on your pelvis, raise your head and chest, look forward. 3, 4 – Return to the starting position in reverse order, relaxing. 3 times.
19). "Beach". The head lies on the hands. Alternately - counter flexion and extension of the legs at the knee joints.
20). “Raise opposite limbs.” 1 – Raise your right arm forward, left leg back, maintain balance (inhale). 2 - Return to the starting position (exhale). 3 – Raise your left arm, right leg (inhale). 4 - Return to the starting position (exhale). 4 times.
21). "Look at the hand." 1 – Raise your right hand to the side - up, look at it (inhale). 2 - Return to the starting position (exhale). 3 – Raise your left hand to the side - up, look at it (inhale). 4 - Return to the starting position (exhale).
22). “Stretch your hand forward.” 1 – The right hand slides forward as far as possible, lower the head (exhale). 2 - Return to the starting position (inhale). 3 – The left hand slides forward, lower the head (inhale). 4 - Return to the starting position (inhale). 3 times.
We count the pulse for one minute and write it down. (Pulse should not exceed maximum heart rate).
23). Lying on your back, diaphragmatic breathing 6 times. (See No. 8).
24). “Kitty” (Bend and arch your back).
25). “Fox tail” (Bending of the spine now to the right, now to the left).
26). Sitting on a chair, hands hold the seat. Rolling from heel to toe.
27). Sitting on a chair, hands on knees. Raise your arms up to your sides (inhale), lower them to your knees, and bend forward slightly (exhale). 5 times.
Homework.
2). Train the vestibular system: lying on the bed on your back, bend your knees, turn on your side, lower your legs off the bed and, pushing off with your hands, sit on the edge of the bed for a few seconds, stand up (spread your legs shoulder-width apart), straighten up, stand for a while, trampling from foot to foot. Now, in reverse order, lie on the bed in the other direction. 3 times in each direction slowly, monitoring your well-being. Avoid dizziness. You can simplify the task by eliminating standing up.
3). Diaphragmatic breathing 6 times before bed. (This exercise helps with the appearance of chest pain due to angina pectoris, since the diaphragm, rising and falling, promotes the movement of blood in the systemic circulation, facilitating the work of the heart).
4). Self-massage of hands and fingers. Exercises for fingers (“Coins” - circular movements with the thumb on the tips of all other fingers, “Shalbans with all fingers in turn”, “Buttons” - press the thumb on the tips of all fingers in turn, “Figurines between all fingers”, “Call to you” all fingers in turn”, “Straighten each finger in turn from the fist”, “Straighten and spread all fingers - clench your fingers into fists”.
5). Long walks, you can run (breathe only through your nose, if there is not enough air, go to walking), skiing in winter, swimming in the pool and classes in a health group according to age are useful. Remember to monitor your blood pressure and pulse.
6). Gymnastics for the eyes.
Let's prepare a ball the size of an orange (or better yet, a real orange),
gymnastic stick ( gymnastic stick length: the distance from the left shoulder joint to the fingertips of the right arm straightened towards the side or standing, measure the distance from the floor to the xiphoid process of the sternum, subtract 10 from this figure),
chair with backrest and rug.
Let's ventilate the room.
Starting position sitting on a chair.
1). "Open - close."
Hands on knees, feet shoulder-width apart.
1- Hands to shoulders (start of inhalation).
2- Straighten your arms to the sides, open your palms (inhale).
3- Hands to shoulders again (beginning of exhalation).
4- Place your hands on your knees and bend forward slightly (exhale). 4 times.
Initial position.

Once! Start of inhalation.

Two! Inhale.
Three! Beginning of exhalation.

Four! Exhale deeply.
2). “Raise your leg.”
Hold the seat of the chair with your hands.
1- Raise your straightened right leg.
2- Lower into original. position.
3- Raise your straightened left leg.
4- Return to original. position. 4 times.
Initial position.
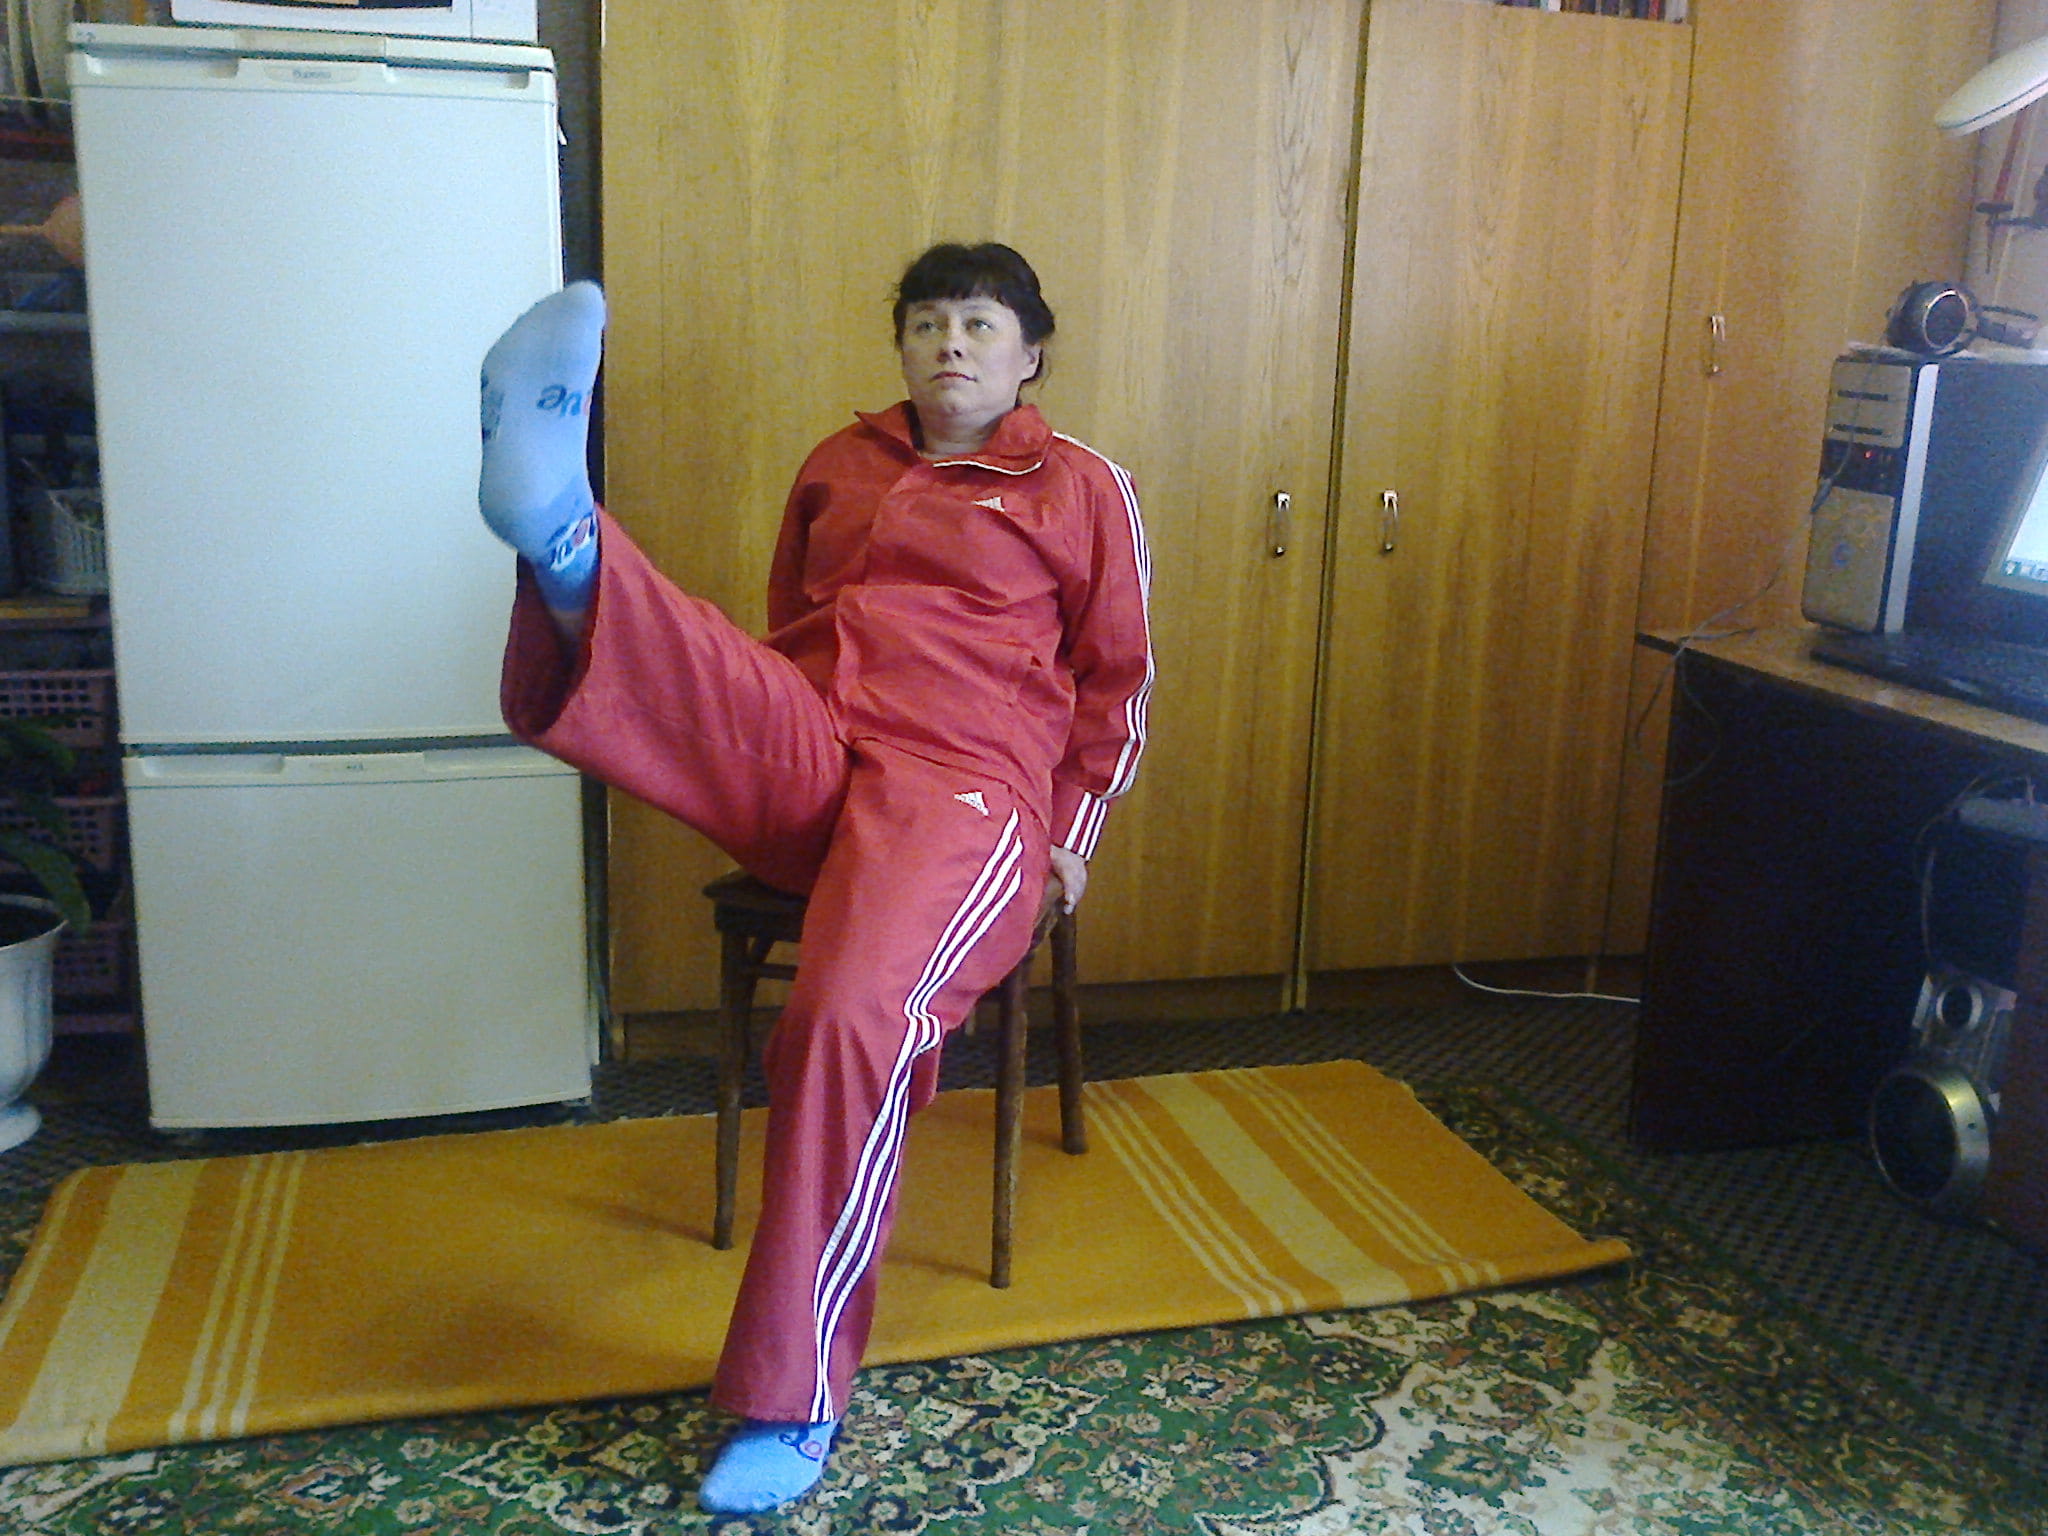
Once! Raise your right leg. Inhale.

Two! Exhalation.

Three! Left leg! Inhale.
3). "Shoulder rotations."
Hands to shoulders, feet shoulder-width apart.
1, 2, 3, 4 – Draw one large circle with your elbows. 4 times.
Then do the same in the opposite direction 4 times.

Once! Circular rotations of the arms in the shoulder joints.

Two!

Three!

Four!
And repeat in the other direction 4 times.
4). "One foot at a time."
Hold the seat with your hands, legs spread wide.
1 - Place your right leg on your left, tightly squeeze your pelvic floor muscles (inhale).
2 - Return to original. position (exhalation).
3 - Place your left leg on your right, squeeze your pelvic floor muscles (inhale).
4 - Return to original. position (exhalation). 4 times.
Place your feet shoulder-width apart.

Right leg - One! Squeeze your patience muscles. Inhale.

Two! Exhalation.

Left leg - Three! Squeeze your patience muscles. Inhale.
Four! Exhalation.
5). "We're swinging the stick."(Balance exercise). Place the gymnastic stick vertically with one end on the floor, press the lower end with your feet, spread your knees wide, place your hands on the upper end of the stick on top of each other.
1 – Leaning on the stick, straighten your arms forward, slowly leaning forward so that your head drops between your hands at ear level (exhale).
2 - Return to original. position (inhalation). 6 times slowly.
Initial position.

Once! Exhalation.
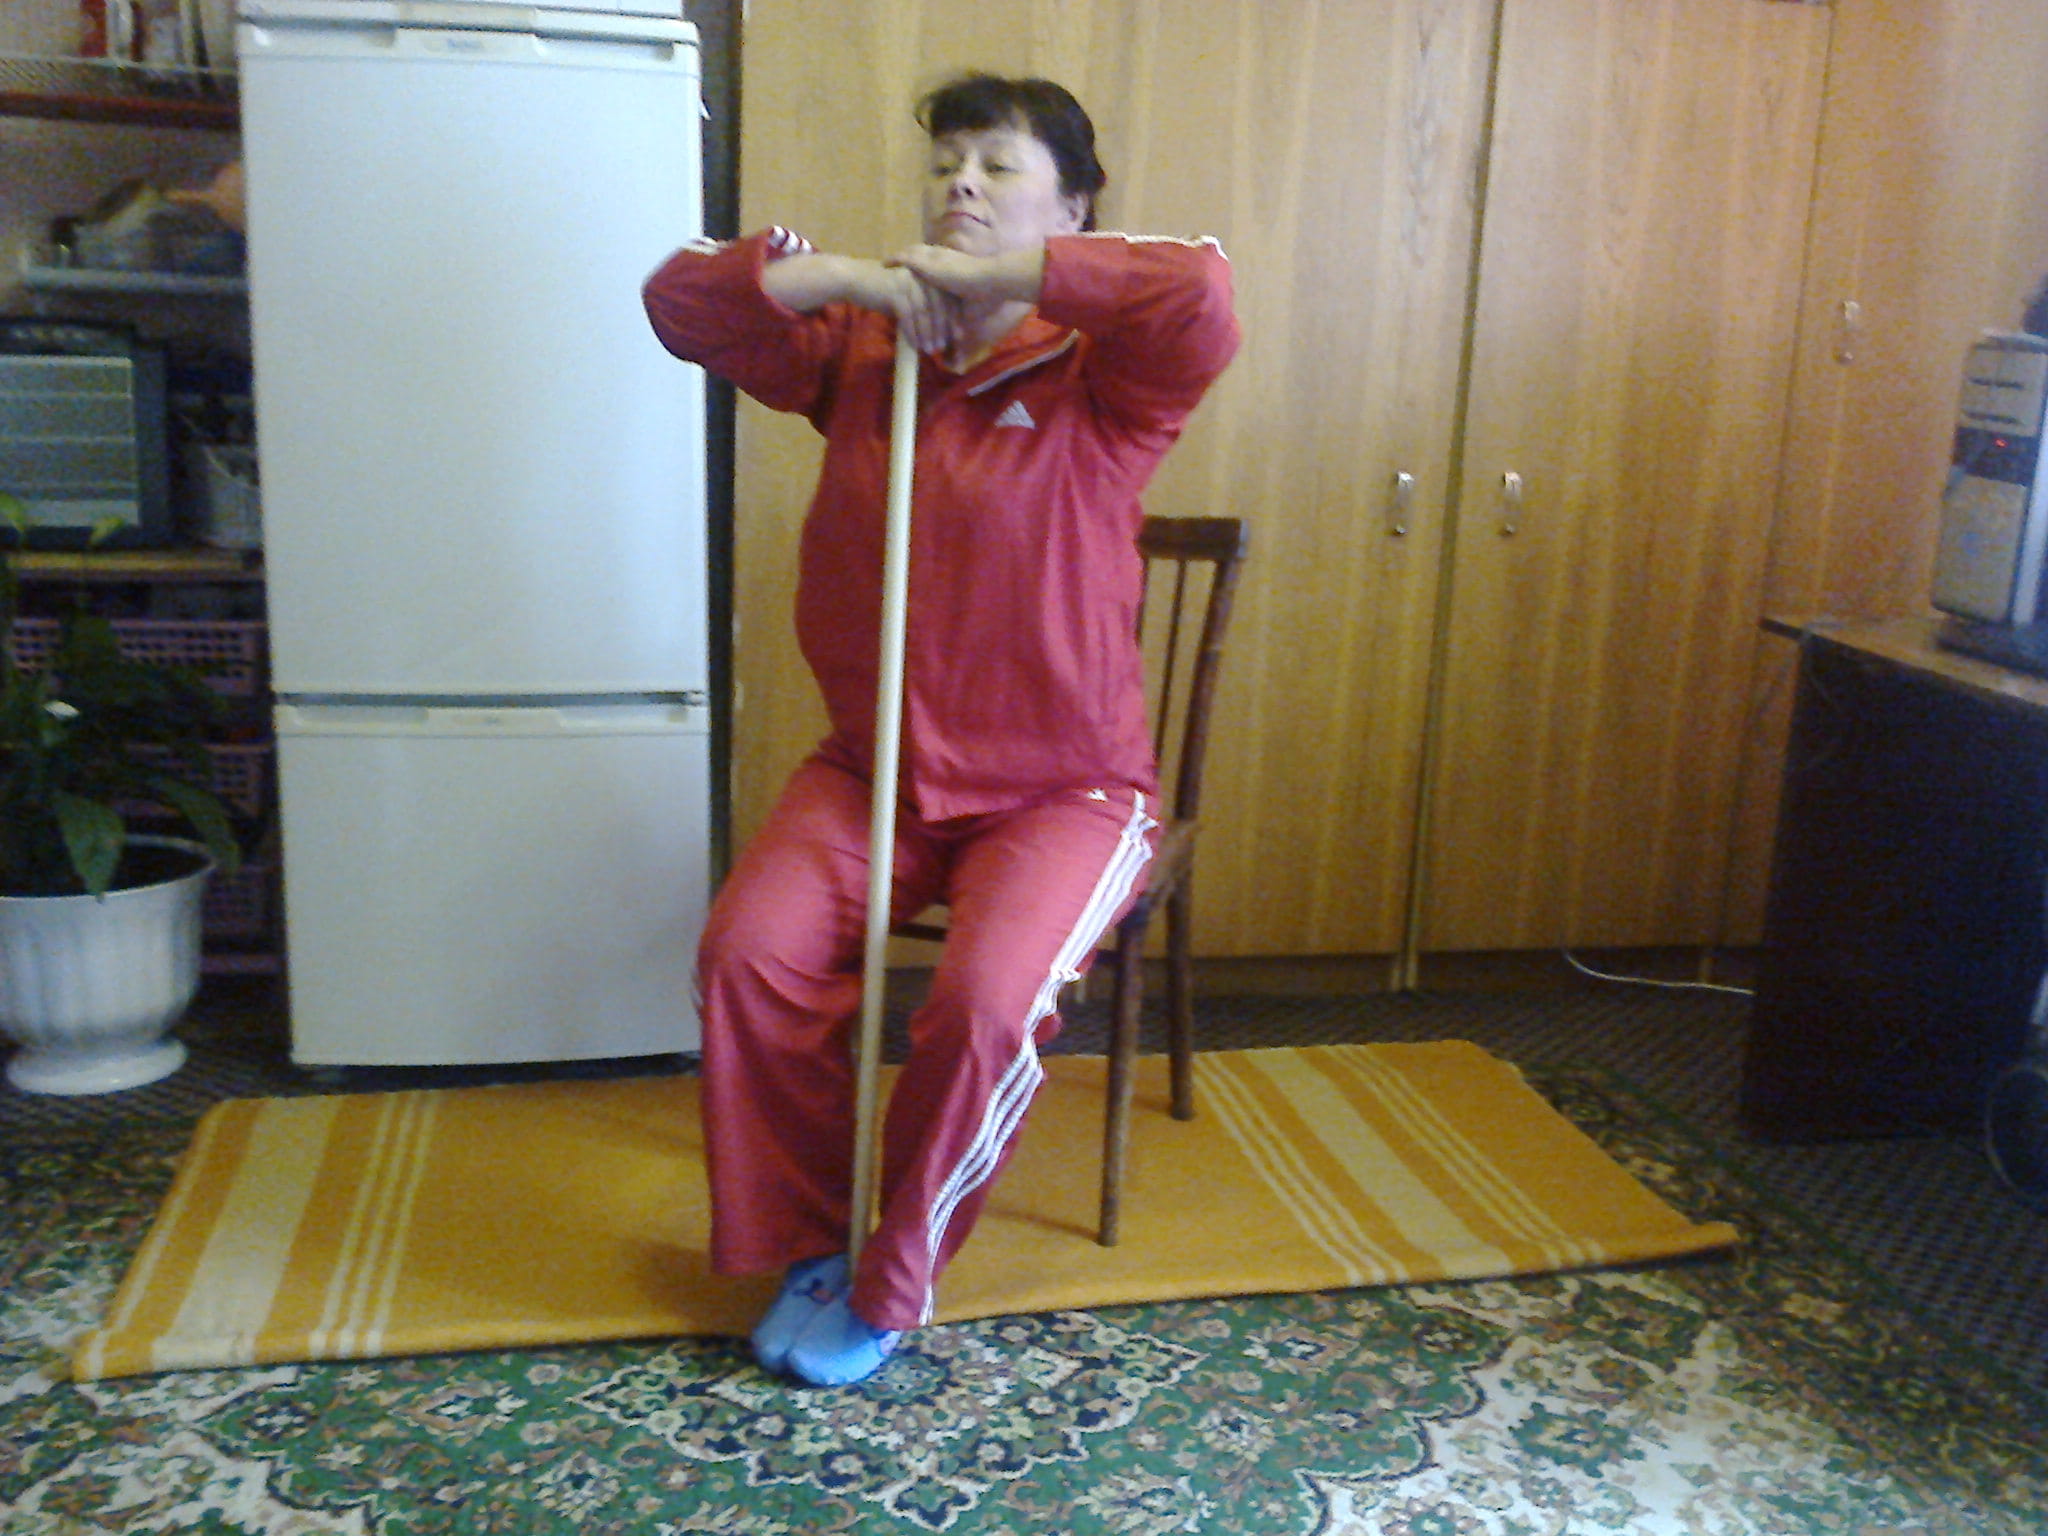
Two! Inhale. Stick to the chest, straighten your back.
If dizziness does not bother you, then this exercise can be complicated by securing the lower end of the stick with your feet, and slowly rotating the upper end, bending deeply forward, then straightening up, bringing the upper end of the stick to the sternum (clockwise and counterclockwise).
6). “Put the stick vertically.”
Take the stick between your palms so that the ends of the stick rest against the middle of your palms, lower the stick down (on your hips), feet shoulder-width apart.
1 – Place the stick vertically on your right leg so that your right hand is at the top and the left is at the bottom (inhale), look at your right hand.
2 – Return to the starting position (exhale).
3 - Place the stick vertically on your left leg so that your left hand is at the top and the right hand is at the bottom (inhale), look at your left hand.
4 – Return to the starting position (exhale). 4 times.
Initial position. A stick between the palms.

Once! Inhale.

Two! Exhalation.

Three! Inhale.
Four! Exhalation.
7). “Roll a stick on your back.”
Press the stick to your back with your elbows, legs apart for stability.
Move the stick along your back with your elbows up (inhale) - down (exhale), do not bend over, keep your back straight.
Initial position.

Inhale - stick up.

Exhale - stick down.
We count the pulse for one minute and write it down. (Pulse should not exceed maximum heart rate).
Let's calculate the pulse in 1 minute.
Starting position lying on your back.
(Pillow under the head to reduce the risk of high blood pressure).
8). Diaphragmatic breathing 6 times. Place your hands on your stomach, bend your legs at the knees.
1 – inhale through the nose, inflating the stomach.
2 – Exhale through the mouth in a thin stream slowly, pursing your lips into a tube; the stomach “deflates”, pull the abdominal wall “into itself”.
Diaphragmatic breathing. Inhale through the nose, “inflate” the stomach.

Diaphragmatic breathing. Exhale through your mouth in a thin stream, pursing your lips into a tube.
9). "Ball under the knee."
1 – Bend your right leg, transfer the ball under your knee to your left hand (exhale).
2 - Return to the starting position (inhale), ball in your left hand.
3 – Bend your left leg, transfer the ball under your knee to your right hand (exhale).
4 - Return to the starting position (inhale). 3 times.

Once! Place the ball in your left hand under your knee. Exhalation.

Two! Inhale. The ball is in the left hand.

Three! Place the ball in your right hand under your left knee. Exhalation.
Four! Ref. position. Inhale. The ball is in the right hand.
10). "Ball in the other hand with a turn".
Arms to the sides, ball (orange) in the right hand, straightened legs together.
1 – Raise your right hand with the ball and move the ball to your left hand, turn your body to the left, take the ball in your left hand (exhale).
3 – Also transfer the ball to your right hand, turning your body to the right (exhale).
4 - Return to the starting position (inhale). 3 times.
Ref. position. Inhale.
Once! Exhalation.

Two! Inhale.

Three! Exhalation.

Four! Ref. position. Inhale.
11). "Ball in the other hand behind the head".
Arms along the body, ball in the right hand, legs straightened.
1 – Hands slide across the floor behind your head, pass the ball to your left hand, without moving your head, raise your eyes towards the ball (inhale).
3 – Place the ball behind your head in your right hand, raise your eyes up (inhale).
4 - Return to the starting position (exhale). 3 times.
Ref. position. The ball is in the right hand.

Once! Hands up, inhale. Ball in left hand.
Two! lower your arms along your body. Exhalation. The ball is in the left hand.

Three! Inhale. Ball in the right hand.

Four! Ref. position. The ball is in the right hand.
12). “Rotate your hands and feet”.
Arms bent at the elbows, hands in fists, feet shoulder-width apart. Slowly and smoothly rotate your fists and feet inward, then in the opposite direction for 4 circles.
Repeat again.
At the same time, we rotate our hands and feet slowly and efficiently.

At the same time, we rotate our hands and feet slowly in one direction, then in the other direction.
13). "Raise your arm, bend your leg".
1 – Raise your right hand up and place it on the floor behind your head, while simultaneously bending your left leg at the knee, sliding your foot along the floor (inhale).
2 - Return to the starting position (exhale).
3 – Raise your left arm up, bend your right leg at the knee, sliding your foot along the floor (inhale).
4 - Return to the starting position (exhale). 4 times.
Initial position.

Once! Right hand, left foot! Inhale.

Two! Exhalation.

Three! Left hand, right foot! Inhale.
Four! Exhalation.
14). "Tension - relaxation". Arms along the body, legs straightened.
1 – Clench your hands into fists, your feet towards you, and squeeze your buttocks tightly (inhale).
2 – Relax all muscles (exhale). 6 times.
Once! Squeeze your hands into fists, lift your feet towards you, and squeeze your buttocks! Inhale.

Two! Straighten your fingers and stretch your toes. Exhalation.
15). "Opposite limbs to the sides".
Arms along the body, legs straightened.
1 - Move your right arm and left leg to the sides (inhale).
2 - Return to the starting position (exhale).
3 – Same with left arm, right leg (inhale).
4 - Return to the starting position (exhale). 4 times.
Initial position.

Once! Inhale. Right hand, left foot!

Two! Exhalation. Initial position.

Three! Inhale. Left hand, right foot!
Four! Exhalation. Initial position.
16). Diaphragmatic breathing 6 times. (See exercise No. 8).
We count the pulse for one minute and write it down. (Pulse should not exceed maximum heart rate).
Starting position lying on your stomach.
17). “Rest your head in your hands.”
Hands bent at the elbows, lie in front of you, raise your head, look up.
1 – Lower your head onto your hands with your right ear, turning it to the left (exhale), relaxation.
2 - Return to the starting position, raise your eyes up (inhale).
3 – Place your head on your hands on your left ear, relax (exhale).
4 - Return to the starting position, eyes looking up (inhale).
4 times.
Initial position. Inhale.

Once! put your head on your right ear. Exhalation.

Two! Inhale. Initial position.

Three! Exhalation. Place your head on your left ear.
Four! Inhale. Initial position.
18). "Hands on the pelvis." Arms extended forward, legs straightened.
1 – Place your right hand on your pelvis.
2 – Place your left hand on your pelvis, raise your head and chest, look forward.
3, 4 – Return to the starting position in reverse order, relaxing. 3 times.

Initial position.

Once! Start of inhalation.

Two! Inhale.

Three! Beginning of exhalation.

Four! Exhalation.
19). "Beach". The head lies on the hands. Alternately - counter flexion and extension of the legs at the knee joints.
Alternately - counter movement of the legs. The body is relaxed.

Alternately - counter movement of the legs.
The starting position is knee-wrist.
20). “Raise opposite limbs.”
1 – Raise your right arm forward, left leg back, maintain balance (inhale).
2 - Return to the starting position (exhale).
3 – Raise your left arm, right leg (inhale).
4 - Return to the starting position (exhale). 4 times.
Initial position.

Once! Inhale.

Two! Exhalation.

Three! Inhale.
21). "Look at the hand."
1 – Raise your right hand to the side - up, look at it (inhale).
2 - Return to the starting position (exhale).
3 – Raise your left hand to the side - up, look at it (inhale).
4 - Return to the starting position (exhale).
Initial position.

Once! Inhale.

Three! Inhale.
22). “Stretch your hand forward.”
1 – The right hand slides forward as far as possible, lower the head (exhale).
2 - Return to the starting position (inhale).
3 – The left hand slides forward, lower the head (inhale).
4 - Return to the starting position (inhale). 3 times.
Initial position.

Once! Exhalation. We stretch our right hand forward.
Two! Inhale.

Three! Exhalation. We stretch our left hand forward.
Four! Exhalation.
23). "Kitty."
1- Bend down (inhale).
2- Arch your back up, head down (exhale). 4 times.

"Kitty." Bend your back down. Inhale.

"Kitty." arch your back upward. Exhalation.
24). "Fox Tail" 1- Move your feet and head to the right with your ear towards your right shoulder. Inhale.
2- Ref. position (exhalation).
3- Move your feet and head to the left to the left shoulder (inhale).
4- Ref. position (exhalation). 4 times.

Once! Inhale.
Two! Exhalation.

Three! Inhale.
Four! Exhalation. Initial position.
We count the pulse for one minute and write it down. (Pulse should not exceed maximum heart rate).
Roll your feet onto your heels.

Roll from heel to toe.
27). Sitting on a chair , hands on knees.
1, 2 - Raise your arms up through your sides (inhale).
3, 4 - Lower to your knees, bend forward slightly (exhale). 5 times.
Initial position.

Once! Hands up, raise your eyes. Start of inhalation.

Two! Hands up. Inhale.

Three! arms to the sides, exhalation begins.

Four! Exhale deeply, bend forward, resting your hands on your knees.
Homework.
1). Self-massage of the back with a roller back massager.

It is better to buy a back massager the size of a gymnastics stick so that you can roll it on your back with your elbows.

Body Massager.

Back massager.

Back massager.

Back massager.

Massage mat for feet.
2). Train the vestibular system: lying on the bed on your back, bend your knees, turn on your side, lower your legs off the bed and, pushing with your hands, sit on the edge of the bed for a few seconds, stand up (spread your legs shoulder-width apart), straighten up, stand for a while, trampling from foot to foot. Now, in reverse order, lie on the bed in the other direction. 3 times each wayslowly, monitoring your well-being. Avoid dizziness. You can simplify the task by eliminating standing up.

We practice getting up and lying down.

First, bend your knees.

Bend your knees towards the edge of the bed and turn onto your side.

Lower your legs off the bed and, pushing with your hands, sit on the edge of the bed.

Slowly sit on the edge of the bed and sit for a while to get used to the upright position.
Stand up decisively, legs apart for stability, arms to the sides. Maintain balance.
Sit down slowly and smoothly, leaning forward slightly, without falling onto the bed.

Lie on the other side, put your feet on the bed.

Turn onto your back. (Training to change body position).
3). Diaphragmatic breathing 6 times before bed. (This exercise also helps with the appearance of chest pain due to angina pectoris, since the diaphragm, rising and falling, promotes the movement of blood in the systemic circulation, significantly facilitating the work of the heart).
4). Self-massage of hands and fingers.
5). .
“Coins” - circular movements with the thumb on the tips of all other fingers,
“Shalbans with all fingers alternately”,
“Buttons” - press with your thumb on the tips of all fingers in turn,
"Figurines between all fingers",
“Call to you with all fingers in turn”,
“Straighten each finger in turn from the fist”,
“Straighten and spread all your fingers - clench your fingers into fists”.
6). Long walks, you can run (breathe only through your nose, if there is not enough air, go to walking), skiing in winter, swimming in the pool and classes in a health group according to age are useful. Remember to monitor your blood pressure and pulse.
7). .

Health group in the pool.
2. Buy a modern exercise bike (increases blood circulation in the pelvis) or an elliptical trainer.It creates an imitation of the movement when running, creates a vertical load on the bones of the lower extremities, which helps strengthen the bones during osteoporosis and for the prevention of osteoporosis, the heart muscle also receives a good load. It is better to buy a magnetic ellipsoid, as it works quietly and smoothly, is very pleasant, and makes you want to practice on it. There is monitoring of the cardiovascular system and other capabilities.
Exercise for the elderly is a mandatory event and should be done systematically. However, due to age characteristics and the accumulated baggage of chronic diseases, physical exercise has some peculiarities. You need to understand this and not force the load, because excessive stress will not bring any benefit, but will provoke an exacerbation of the disease.
Let's look at the significant aspects of daily sports activities:- Purpose of charging.
- Selection of exercises taking into account existing pathologies.
- Time limit.
The morning exercise routine for people 50 years of age and older is not intended to set personal records in running, weight lifting, or long-distance swimming. The main goal of daily gymnastics is preventative. That is, your properly organized morning workout will not allow the development of diseases that are associated with age: atherosclerosis, oncology, metabolic disorders.
After 50 years, all metabolic processes proceed more slowly than in young people, and if a person deprives himself of physical activity, he begins to age progressively. “Slow” metabolism leads to nutritional disturbances in the joints, spine, and all internal organs. Moderate exercise is the best way to stimulate metabolic processes.
For both older women and men, exercise is the simplest and most accessible means of maintaining beauty, health and physical activity even in adulthood.
Choosing the type of activity

Oddly enough, choosing the right exercises begins with a trip to the clinic. Don’t be surprised, your doctor will tell you what exercises you shouldn’t do if you have existing illnesses. For example, if you have diseases of the knee joints, jumping or squats are not recommended; if you have vertebral hernias, you should not sharply straighten your spine. In case of arrhythmias and for patients with atherosclerosis, prolonged and active exercise is unacceptable - it is often they that lead to an attack of angina pectoris, or even a heart attack.
The optimal solution is to stop by the physical therapy room and sign up for a training session in therapeutic exercises.
There are many advantages to doing this:- You can easily learn the set of exercises you need;
- Master breathing techniques;
- Work out in a group of like-minded people.
About training time
The optimal time frame for morning exercises is distributed as follows:
- For those over 50, it is acceptable to exercise for 45 minutes.
- For those over 60, classes should be shorter and last half an hour.
- After 75 years, the sufficient time for classes is 25 minutes.
Choose the time of day for charging yourself, but it’s better if it’s in the morning. After sports activities, take a contrast shower, if not contraindicated.
Now let's talk directly about the exercises.
Let's start classes!
Exercise for older people over 60 years of age brings undoubted benefits.
Firstly, a person is active, his metabolism is activated, blood supply to organs and tissues improves, and congestion in the joints and spine is not observed.
Expert opinion
Over time, pain and crunching in the back and joints can lead to dire consequences - local or complete restriction of movements in the joint and spine, even to the point of disability. People, taught by bitter experience, use a natural remedy to heal joints, which is recommended by orthopedist Bubnovsky... Read more"
Secondly, with the help of special exercises you can get rid of pain, fatigue and discomfort. In addition, a good mood is maintained and weight is normalized.
A very important factor is improved memory and clarity of consciousness.
If these reasons are not enough to start practicing, then you can consider another aspect of life. As a rule, when a person retires, his lifestyle completely changes. And in many cases, “grandmothers” and “grandfathers” begin to feel their uselessness for society. In addition, they simply have nothing to occupy themselves during the day. Therefore, the best option would be to choose a hobby in the form of exercise.
To recharge your batteries and get in an excellent mood for the whole day, you can do simple morning exercises. The most convenient way to watch and do exercises for older people is through a video, where the instructor gives clear instructions. But first, you can familiarize yourself with one of the complexes in the form of a description:
Immediately after waking up, you need to soak up some time in bed. This will give the whole body the opportunity to wake up.
Now you can get up and do neck stretches. To do this, you need to slightly lower your head (so that there is no pain) and rotate your neck in different directions. The movements should resemble a pendulum.

A little about secrets
Have you ever experienced constant back and joint pain? Judging by the fact that you are reading this article, you are already personally familiar with osteochondrosis, arthrosis and arthritis. Surely you have tried a bunch of medications, creams, ointments, injections, doctors and, apparently, none of the above has helped you... And there is an explanation for this: it is simply not profitable for pharmacists to sell a working product, since they will lose customers! Nevertheless, Chinese medicine has known the recipe for getting rid of these diseases for thousands of years, and it is simple and clear. Read more"
We adopt the experience of the Celestial Empire and turn to professionals
"Former" athletes
For men over 50 years of age who were actively involved in sports in their youth, time and workload restrictions seem unreasonable. They are still active in the gym, lifting weights and striving for perfect forms. Of course, each specific case needs to be examined separately. But remember, what’s good at 20 is not good after 50. You can’t argue with physiology, and it’s better to avoid high loads.
As an alternative to professional strength sports, consider yoga, race walking, and oriental healing techniques. But under no circumstances should you quit.
We offer a simple complex for practicing at home:- Walking in place. At first you need to take slow and calm steps, but after a couple of minutes you can speed up a little. And then slow down again. It is advisable to alternate walking for 6-10 minutes.

- Stand on the floor with your feet shoulder-width apart and your hands on your shoulders. You need to make rotational movements for 2-3 minutes, but be sure to draw in your stomach.

- Spread your feet wider than shoulder-width apart, but so that you maintain full stability. Next, you need to tilt your body first to one leg, then to the other. When raising your torso, spread your arms to the sides. Try to touch the toe of the opposite limb. That is, with your left hand to your right leg and vice versa. It is enough to make 4 tilts in each direction.

- Place 2 chairs with backs between each other so that you can hold on to them as comfortably as possible. Do 5-7 half squats.

- IP is the same, but now you need to alternately swing your legs forward and backward. If possible, place the leg you are resting on on tiptoes. There should be 5-8 swings.
- Now place the chair with its back facing you, lean on your hands and swing each leg.


- A very good exercise that leads to getting rid of extra pounds: sit on the edge of a stable chair and place your hands on your waist. You need to move your shoulder blades as far as possible while moving your elbows back. You do this while inhaling. As you exhale, move your elbows forward.
